Blog
Fitting Instructions for Easyfit uPVC Windows & Doors

“Get the best out of your Windows & Doors by following these simple fitting instructions.”
TOOLS REQUIRED
You will require the following tools to fit UPVC Windows and Doors successfully:
- A coarse-toothed saw such as a Bow Saw for cutting out the old frame.
- A fine-toothed saw for cutting any trims, accessories, cills, etc.
- A claw hammer.
- Spirit level.
- A large screwdriver or power driver for screwing the frame fixings.
- An electric drill and masonry bit for drilling through the frame and brickwork.
- A paint scraper or similar thin-bladed tool for removing the glazing beads.
- A rubber mallet for re-fitting the glazing beads.
- A skeleton gun for applying the silicone sealant.
- Step ladder and extension ladder if required.
You may also find the following tools useful:
- A plastic glazing paddle for maneuvering the double-glazed units in situ to insert packers. Don’t use a chisel or similar steel object for this job as you will almost certainly damage the glass.
- A Stanley knife.
- Various drill bits.
- A jemmy bar.
PREPARATION
Before you begin to fit your new UPVC Windows or Doors there a few precautions that you may well wish to consider.
The following minimum safety equipment should be worn when removing old frames.
- Goggles or similar eye protection especially when breaking out glass. Work gloves.
- Use dust sheets inside and outside.
- Keep children and animals as far away as possible.
- Start early enough to complete the job. If you are inexperienced or you have particularly difficult frames to remove, it could take all day to complete one frame.
- GOLDEN RULE. Never ever remove the old frame before you have double-checked that the new one is the correct size and you have everything you need at hand.
- Facilities for disposal of the old frame and glass.
- Dispose of your rubbish thoughtfully, bearing in mind the danger of large pieces of broken glass.
REMOVING THE OLD FRAME
Start by removing any opening vents. The simplest way is to just jemmy them away at the hinge side. Using a bow saw, cut through any transom or mullion bars that have no glazing in them. Next, saw into any transom or mullion bar that has glazing on one side. Take care as the saw approaches the glass as it will crack as soon as it touches it. Make two sloping saw cuts in each bar and knock the frame away from the glass. With care this can be done without breaking the glass.
If the window is a fully glazed frame with no openers or if you have taken out as much as possible and are down to the glass, then there is no other way than to break it out. WARNING: You must wear gloves and eye protectors for this operation.
This bit requires care and a couple of tips to do this safely are: – start with a sharp tap with the hammer near any corner. Do not hit the glass in the centre as this could cause large pieces of glass shards to fly off in any direction. Aim to crack the glass and waggle out large pieces, its easy when you get the hang of it.
Once the majority is removed start sawing through the main side, top and cill sections in turn and lever away from the brickwork taking care not to damage the edges of the brickwork. If using a jemmy bar, place a scrap of timber between the jemmy and the brick to prevent damage.
FITTING THE NEW FRAME
Once the frame has been removed, brush away any loose debris or mortar leaving a clean hole to receive the new frame. If you are fitting a frame with a cill, first decide if you are going to joggle the cill around the brickwork or cut it flush to the finished width of the hole. Whichever way you decide to do it, cut the cill to size with a fine toothed saw to fit tight back to the inside edge where the old frame sat. You may have to remove the tongue of the internal window board first. Once the cill has been cut to size, apply a line of sealant along the cill up stand and across the frame platform at each end before screwing them together, through the bottom frame section along the centre line and into the cill.
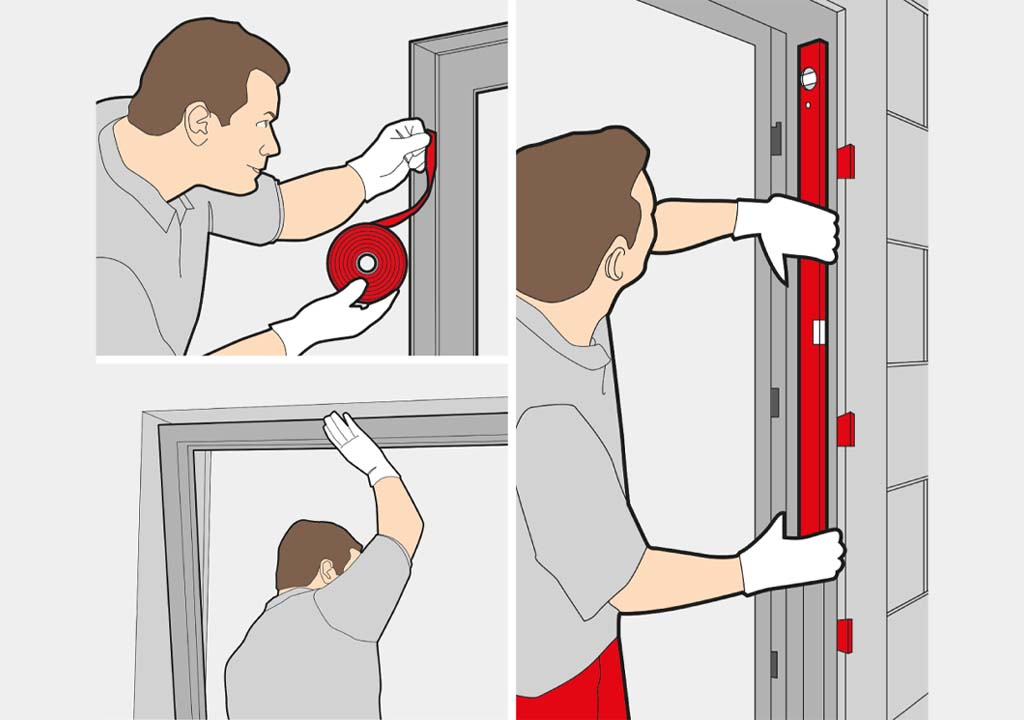
Offer the frame into the opening and ensure the frame is level, plumb and not in twist before wedging into position. Drill through the frame jambs and into the brickwork for a depth just greater than you fixing screws and fix firmly without distorting the frame sections, use packers to take up any space between the frame and the brickwork.
Fixings should be no greater than 600 mm apart and 150 mm away from any frame joint. Hammer plugs are best, just tap them through the hole until they are home, then screw them up with a power driver just enough to grip firmly, don’t over tighten. Generally the frame heads and cills are not fixed but on wide frames, if you feel the need, apply a liberal smear of sealant on any fixings that are through the bottom frame member.
- Offer the frame into the aperture, temporarily wedging it into position making sure it is level and plumb.
- Fix the frame into the aperture using either fixing lugs or by drilling and fixing through the outer frame. Wedges should be used to prevent distortion of the frame.
- Check the window/door for correct operation before sealing with silicone and making good. Any malfunction should be corrected now.
GLAZING
Starting with one of the longest beads first, remove the glazing beads by pushing a sharp chisel or a rigid paint scraper between the bead and the frame joint at approximately the centre point. A sharp tap on the butt of the tool should allow the bead to be freed. It is most important to refit the beads in the same positions as they were removed, they may vary in length slightly, due to the manufacturing process.
- Place into position the glass packers approx. 100mm in from each corner. (Intermediate packers should be used if the double glazed unit is wider than 1200mm).
- Place the double-glazed unit into the frame ensuring correct positioning on the glass packers.
- Starting on one of the shortest lengths, fit 3 of the beads moving around the frame using a rubber mallet, finally fitting the last bead by bending into position.
N.B. It is always best to leave one of the longer beads until last as a long bead will locate and bend more easily.
TOE & HEELING
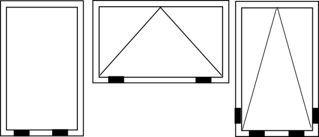
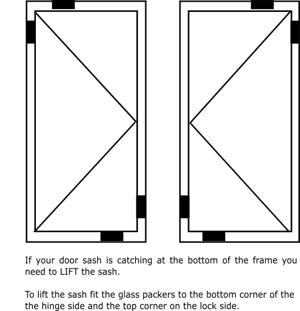
It is essential that glass packers are used to support the double-glazed units to prevent them from standing in any water that may collect in the frame rebate. This can cause failure of the seal of the double glazing and will invalidate your guarantee if packers are not used. Packers must not cover the drainage holes in the frame. Both leaves of the double-glazed unit must be supported by the packer, do not allow the packer to support one leaf only as it may bed into the sealant and cause failure of the unit.

The objective of ‘toe & heeling’ is to transfer the weight of the glass onto the hinge side of the frame. Correct use of this technique will give trouble free operation once the vents have been set correctly. The vent should be flexed upwards if necessary to allow the insertion of the top packers

N.B. Adjustment of hardware should not be attempted until the frames and glass has been correctly packed and installed.
ADJUSTMENTS
Window hinges.
Generally the window hinges require no adjustment. However should you wish to adjust the tension on the friction stay, this can be achieved by screwing the brass screw, set in the black plastic pad, in or out to increase or decrease the tension. The adjustment screw can be accessed by opening the vent.
Window locking mushroom cams.
The cams on the window locking mechanism can be adjusted with an Allen key that is located in the centre of the mushroom cams. The cams are eccentric and can be turned to increase or decrease the closing pressure of the mechanism. They should also be used to adjust the cams if you experience any ? wracking? of the window vent. This is usually caused by the pressure being too tight and the cams grinding onto the keeps.
Door Hinges.
Door hinges can be adjusted in three planes. Vertically | horizontally | in/out. Vertical adjustment can be achieved by a 4mm AF Allen key via the hole on the side of the die cast cover. Horizontal adjustment is by a 5mm AF Allen key in the base of the hinge pin which can be accessed by removal of the plastic base cover. In/out adjustment, although rarely necessary, is similarly adjusted by turning the eccentric top screw found under the top plastic cover.
Door locking mushroom cams.
The cams on the door locking mechanism can be adjusted with an Allen key that is located in the centre of the mushroom cams. The cams are eccentric and can be turned to increase or decrease the closing pressure of the mechanism. They should also be used to adjust the cams if you experience any wracking of the door vent.
On no account should mechanisms or hinges be adjusted to compensate for incorrect installation or ‘toe & heeling’ of the glass. Adjustments should only be carried out after you are certain that the installation has been carried out correctly.
Should you request a service call and any of these instructions have not been applied, a charge will be made.
Provided that you have observed the instructions in this leaflet, your windows and doors will provide you with years of trouble free service with only the occasional oiling of moving parts being necessary.
COMPLETION
All that remains is the cleaning of the frames and then sealing them. The frames should be cleaned with clean soapy water; a non-abrasive cleaning cream may be used for stubborn marks. After the frames and working area has been cleaned the frames should be sealed inside and out with a silicone sealant, alternatively a painter’s caulk may be used inside only. Using a thin opening of the nozzle, apply a thin continuous seal by squeezing the skeleton gun trigger with an even pressure. At the end of the stroke, press the release mechanism to stop the pressure. Keep the nozzle clean. Do the same outside but you may need to widen the nozzle by cutting it back, make a clean sloping cut with a sharp knife for easier application. You can also use masking tape for neatness, removing before the sealant sets. The sealant can be smoothed out by using a finger dipped in soapy water.


